OnePIC을 만들면서 필자가 겪었던 어려움들과 깨달음들에 대해서 포스팅 해보려고 한다.
이번 포스팅은 TensorFlow Lite(Android)를 사용한 객체 감지 방법에 관해 이야기하려고 한다.
TesnorFlow List 란
TensorFlow Lite: 모바일 기기에서 TensorFlow 모델을 실행할 수 있게 해주는 경량화된 버전의 TensorFlow 라이브러리
- 아이폰, 안드로이드 등 다양한 모바일 플랫폼에서 사용가능.
- 모바일 기기에서 실시간으로 머신러닝 모델을 실행할 수 있어서, 모바일 애플리케이션에서 머신러닝 기술을 활용할 수 있게 해줌
주요 특징
- 지연 시간(서버까지의 왕복 없음)
- 개인 정보 보호(기기에 개인 정보를 남기지 않음)
- 연결성(인터넷 연결이 필요하지 않음)
- 크기(모델 및 바이너리 크기 축소)
- 전력 소비(효율적인 추론 및 네트워크 연결 불필요)
TensorFlow Lite를 이용한 객체 감지
TensorFlow Lite를 이용한 객체 감지 참조 코드
TensorFlow Lite (Android)를 사용하여 커스텀 객체 감지 모델 빌드 및 배포 | Google Developers
TensorFlow Lite (Android)를 사용하여 커스텀 객체 감지 모델 빌드 및 배포 | Google for Developers
이 Codelab에서는 이미지에서 객체를 감지할 수 있는 Android 앱을 빌드합니다. 먼저 TFLite Model Maker를 사용하여 커스텀 객체 감지 모델을 학습시킨 다음 TFLite 태스크 라이브러리를 사용하여 배포합
developers.google.com
실행 Setting
- 소스코드 다운로드 (odml-pathways-main.zip)
- 안드로이드로 파일 열기
- Gradle 파일 ( Module ) 에서 다음 수정
- implementation "org.jetbrains.kotlin:kotlin-stdlib:$kotlin Version" → 자신의 Kotlin Verson 으로
- 코틀린 버전 확인⇒ Kotiln version = 1.7.20
- File → Settings → Langages & Frameworks → Kotlin
- 모델 다운로드
- 내가 사용한 모델 : lite-model_efficientdet_lite0_detection_metadata_1 - 모델을 안드로이드의 assets에 추가
- 코드 수정
val detector = ObjectDetector.createFromFileAndOptions(
	this,
	"salad.tflite", // 이를 model.tflite 로 변경
	options
)
코드 분석
전체적인 코드 흐름
💡 setViewAndDetect(bitmap) → runObjectDetection(bitmap) → DetectionResult(it.boundingBox, text)
함수 및 클래스 설명
private fun setViewAndDetect(bitmap: Bitmap)
: (선택한 이미지를 보이고) → runObjectDetection 호출
- 앱 UI가 차단되지 않도록 백그라운드 스레드에서 runObjectDetection 호출
- 이미지를 선택하거나, 사진을 찍었을 때 호출
lifecycleScope.launch(Dispatchers.Default) {
	runObjectDetection(bitmap)
}
private fun runObjectDetection(bitmap: Bitmap)
: 이미지를 받아 이미지의 객체 분석하여 결과 표시
- Step1. TFLite의 TensorImage 객체 생성
val image = TensorImage.fromBitmap(bitmap)
- Step2. 디텍터 개체 초기화
val options = ObjectDetector.ObjectDetectorOptions.builder()
	.setMaxResults(5)
	.setScoreThreshold(0.3f)
    .build()
val detector = ObjectDetector.createFromFileAndOptions( this, "model.tflite", options )
- Step3. 주어진 이미지를 디텍터에 공급
val results = detector.detect(image)
- Step4. 탐지 결과를 구문 분석하여 표시
→ DetectionResult 객체 → drawDetectionResult 호출
val resultToDisplay = results.map {
	// 가장 높은(상위 1개) 결과 텍스트로
  val category = it.categories.first()
	val text = "${category.label}, ${category.score.times(100).toInt()}%"

	// 탐지 결과를 표시할 데이터 개체 만들기
	DetectionResult(it.boundingBox, text)
}

// 비트맵에 탐지 결과를 그려 표시
val imgWithResult = drawDetectionResult(bitmap, resultToDisplay)
runOnUiThread {
	inputImageView.setImageBitmap(imgWithResult)
}
data class DetectionResult(val boundingBox: RectF, val text: String)
: 시각화를 위한 객체 감지 결과를 나타내는 데이터 클래스
- boundingBoxes :객체가 있는 직사각형
- text : 감지 결과 문자열
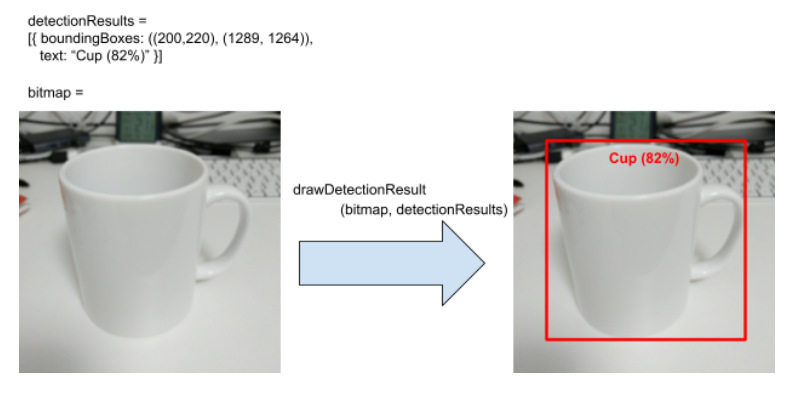
private fun drawDetectionResult(bitmap: Bitmap,detectionResults: List<DetectionResult>) : Bitmap
: 각 개체 주위에 상자를 그리고 개체의 이름을 표시
→ bitmap의 detectionResults에 객체 감지 결과를 그리고 수정된 복사본을 반환
- detectionResults: ArrayList

실행 결과
'OnePIC (Android App) > 사진 편집 기능' 카테고리의 다른 글
| Segmentation 이란? (0) | 2024.01.23 |
|---|---|
| [얼굴 변경 :Face Blending] 얼굴 잘라서 사진 위에 합성 (3) | 2023.12.26 |
| [얼굴 변경 :Face Blending] 두 사진에서 동일 얼굴 찾기 (0) | 2023.12.26 |
| [얼굴 감지] MLKit를 활용한 얼굴 감지 (1) | 2023.12.21 |
| [객체 감지] 공공 AI API 이용해서 객체 감지 (0) | 2023.12.20 |


